28 January 2015

Wednesday Grannies - Edging Tutorial

Hello! With another Wednesday comes the last of tutorials to make the Sunburst Granny Square Blanket. This one is to hook up an Edging, and comes directly in the wake of the Sunburst Granny Square tutorial and the Square Joining tutorial.

UK stitch terminology: chain (ch), slip stitch (sl st), treble (tr), standing treble (st tr), crab stitch (cr st)

Before you start, you will need your joined squares and yarn in as many colours as you wish. I personally used Stylecraft Special DK in Sherbet, Turquoise, Petrol and Emperor on a 4mm crochet hook.


1. Make a standing treble (here's a great tutorial) in one corner (chain 2 space) of your piece:


2. Make two trebles in the same space:
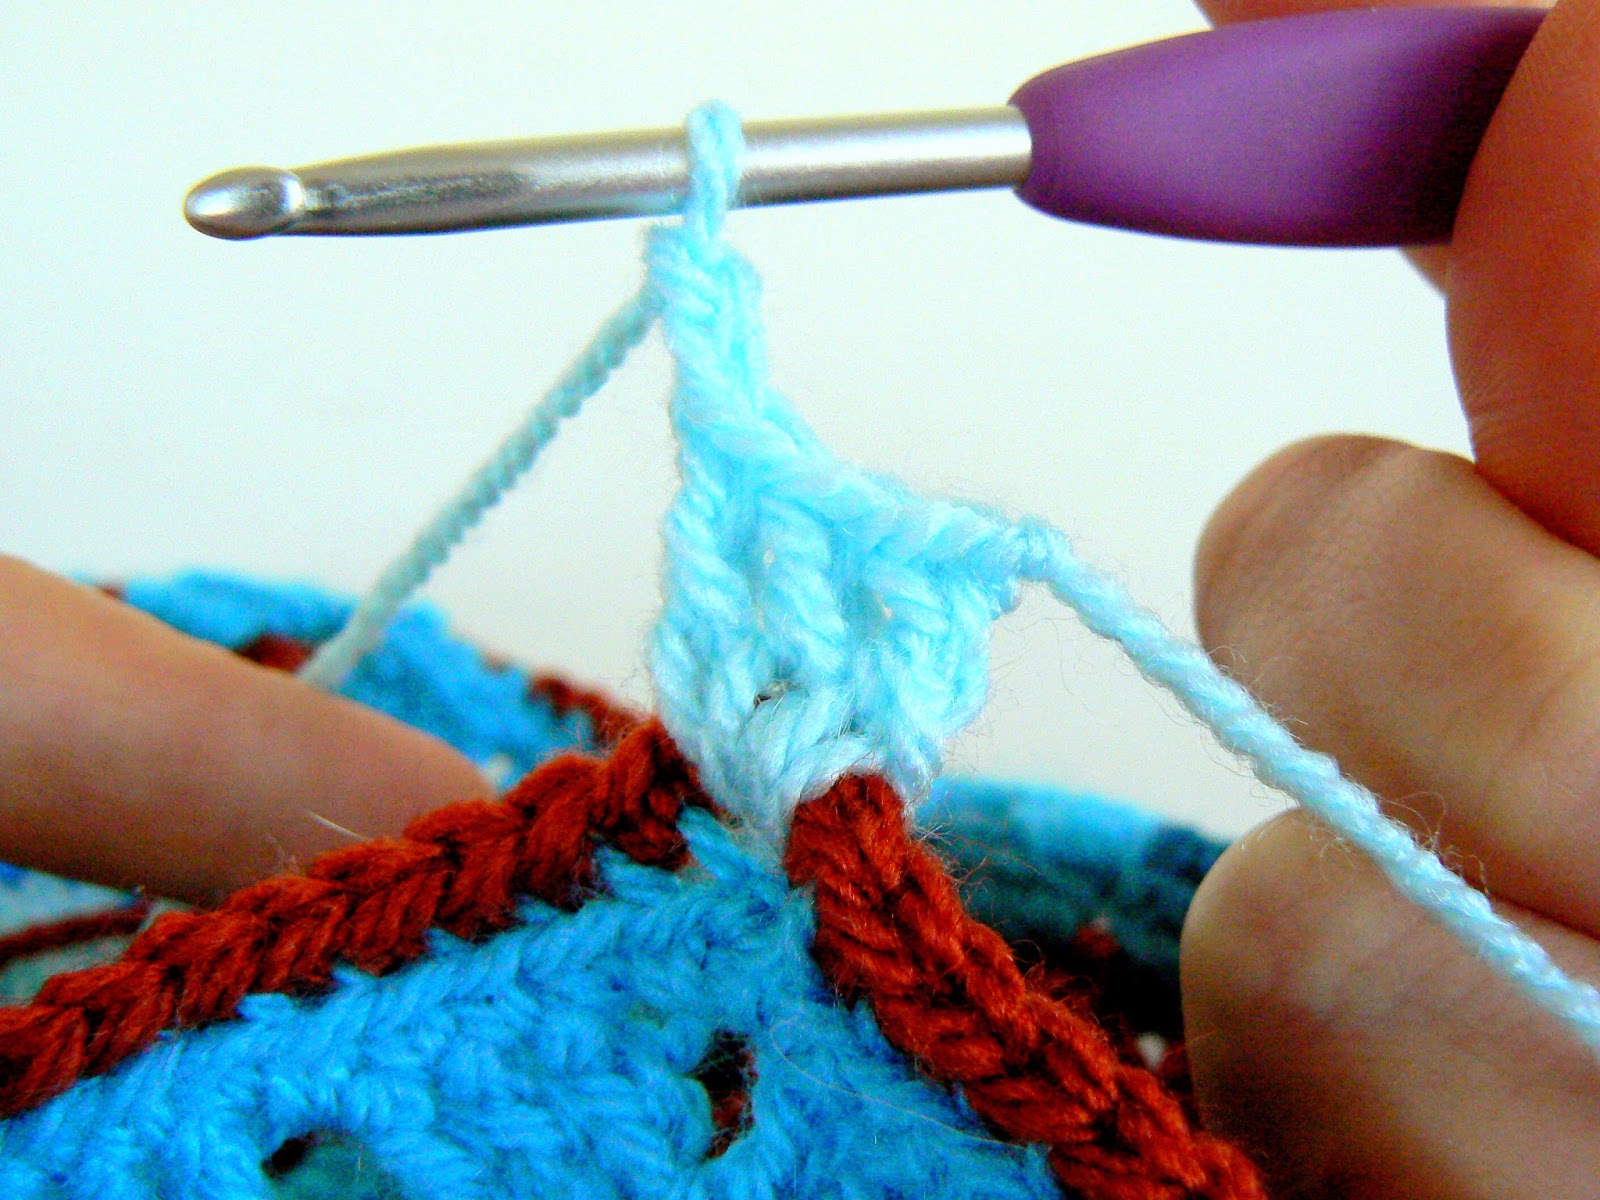

3. Chain 2:


4. Three tr in the same corner:


5. Ch 1:


6. 3 tr, ch1 in dc directly above gap between trebles from last row of granny square (in this case, 4 dc were skipped but it can vary from square to square):


7. *3 tr, ch1 in dc directly above gap between trebles from last row of granny square*, repeat * to * as many times as needed until you reach the first intersection (Oops, no photo here, sorry!).

8. Time to skip the joining! Skip 2 dc after the joining, 3 tr, ch1:


9. Repeat steps 7-8 as many times as there are squares until the next corner.

10. Time to turn a corner! Yarn over, insert hook into ch2-space of corner:


11. 3 tr, ch2, 3 tr, ch1 into the same space:


12. Repeat steps 6-9 twice until you reach your starting point:


13. Join with a slip stitch to first treble:


14. Fasten off. Round 1 of your edging is finished!


15. Change colours, repeat steps 1-5:


16. Make 3 tr into next ch1-space between trebles from previous row, ch1:


17. *Repeat step 16 until you reach next corner*, repeat steps 10-11 into ch2-space between trebles of previous round**. Repeat * to ** twice, repeat * to *.


18. Repeat step 13. Fasten off. Round 2 of your edging is done!


19. Change colours. Repeat steps 15-18, fasten off. Round 3 of your edging is done!


20. Repeat steps 15-18 as many times as needed or wished.

For the final round, change colours. You are going to make a round of crab stitch. That's basically the same steps as for a normal dc stitch, but going in the OPPOSITE direction (so from left to right if you are right-handed, and from right to left if you are left-handed).

21. Make a standing dc (there's an excellent tutorial here) in one ch2-space (corner) of your piece:


22. Insert hook in next stitch to the right (or left if you are left-handed):


23. Pull yarn through stitch, leaving you with two loops on the hook:


24. Yarn over and pull through both loops on your hook. You should end up with this strange-looking lump of a stitch. Don't worry, it will even itself out as you work the rest of the stitches.


25. Repeat steps 22-24 until you reach next corner:


26. Work 3 cr st into ch2-space of the previous round:


27. Repeat steps 25-26 twice, and step 25 once more, until you reach the first corner:


28. Make 2 cr st in ch2-space:


29. Join with a sl st to standing dc:


30. Fasten off, weave in ends, you are DONE!


Thank you for reading this tutorial. Please let me know if you find any mistake or anything unclear. Happy hooking and do send pictures of your work, I'd love to see what you've made!

And don't forget to go to Jijihook's to see what the others have done! :)

26 January 2015

Thick And Thin Cowl Scarf - Pattern

Hello, hello! To celebrate Little Crochet's 1st birthday (slightly late, admittedly), methinks a free pattern is in order. This is a stylish cowl scarf made with a gorgeous textured 100% wool yarn. It's very easy to make and will add instant class to any outfit, not to mention that it will keep you nice and toasty throughout those cold winter months.

I made a first one last year, originally as a gift, but loved it so much that I cheekily ended up keeping it for myself, tee hee.


Not long after, I bought a different shade of the same yarn. It sat for months at the bottom of my stash, until a couple of weeks ago, when I unearthed it and turned it into a second cowl:


So without further ado, let's move on to the pattern!

Here's what you'll need:
2x50g balls of Rowan Thick And Thin (Shale)
7mm crochet hook
Gauge: 10x10cm = 12x12 dc
Finished dimension: 27x56cm
Terminology (UK): chain (ch); slip stitch (sl st); double crochet (dc) = US sc; treble (tr) = US dc;
ch1 does not count as one stitch throughout
ch3 counts as one treble throughout

Cowl body:
Chain 19.
Row 1: tr into 4th ch from hook, tr in next ch to end, turn (16 tr).
Row 2: ch3 (counts as 1 tr), tr in next tr from previous row to end, turn.
Row 3: repeat row 2.
Row 4: ch1 (does not count as one stitch), dc in last tr from previous row, dc in next tr to end, turn. (16 dc).
Row 5: ch1, dc in last dc from previous row, dc in next dc to end.
Row 5-53: repeat row 5.
Row 54: ch3, tr in next dc from previous row, tr in next dc to end, turn.
Row 55: repeat row 2
Row 56: repeat row 2 without turning at the end. Do NOT fasten off.

Edging:
*Ch1, 2 dc in the next three side trebles, 1 dc in each row end of dcs, ch1*, 1 dc in each stitch of the foundation chain, repeat from * to *, 1 dc in each tr from row 56, sl st to first ch1. Fasten off and weave in ends.

Buttons:
Sew two buttons along the side of the scarf, within the dc section and right up to the treble section as in the above pictures. The treble section on the opposite side will act as buttonholes when you wrap the cowl around your neck. There are various ways to wrap and button up this cowl: so experiment, have fun and keep warm!

There you have it, peeps, a quick and easy pattern just for you! Please let me know if you spot any mistakes or if anything is unclear. Thanks for reading :)

Übercute Amigurumi Kitty Cat

Hello, my darlings! I am very excited about this post, as it is about something that is a little different from my usual crochet realm.

But let's start with the beginning. You have probably gathered by now that I am the stereotypical craft lady who's also crazy about cats. Proof here and here. And if there is one thing I particularly love about cats, it's when they do the 'cat loaf'. No, that is not a testimony to their baking skills, but a position they assume when they are relaxed and content in their environment. Mr Little Crochet calls it the "No-Leg Cat" position. So, basically, it's when the cat tucks in her paws under her body, making it look like she's one single block, hence the 'loaf' nickname. Here is an example. And another one. Oh, and for scientifically comic purposes, the bottom view.

For a while now, I had been toying with the idea of crocheting a cat loaf. It started off with a few basic sketches to get an idea of the shapes needed:


And after much crocheting, counting, taking notes, more crocheting, counting, stuffing and sewing, this is what I ended up with:


Eeeek! I have to say I am quite smitten with this little kitten. I plan to give it as a birthday gift to the daughter of two friends of mine. Well, let me tell you this: it ain't gonna be easy to part with it!

A little note: you may have noticed the white patch towards the rear of the body, in the pictures above. The funny thing is, when I showed the finished kitty to friends and relatives, two of them asked me completely separately and without having consulted each other what was meant to be in the white patch. This is when I decided to add something to said white patch, and settled for a couple of little felt hearts, as you can see below:


It makes for a little bit of a cuteness overload, but I believe the intended recipient will be able to handle it.

So what do you think? Is it the kind of present you'd give a little girl? Or come to think of it, how about a Valentine's gift for your loved one?

Well, if it is, watch this space, because the pattern is in preparation! :)

Thanks for reading!

21 January 2015

Wednesday Grannies - A Future Tutorial

Hello everyone! Well, this hasn't been the most productive week granny-wise, mostly due to unwanted man-flu germs treacherously passed onto me by mean co-workers.

So instead of presenting you with a tutorial for the edging of my Blanket, I can only produce a teaser of said tutorial. A future tutorial, or a tutorial-to-be, if you like. Anything but an ex-tutorial. Oh dear, please excuse my appalling sense of humour.

Ahem, moving on swiftly. Here are this week's pics:


Here you are, folks, thanks for reading and see you soon with hopefully a complete tutorial! :)

For more granny squares, head this way to Jijihook's.

20 January 2015

The Final Christmas Gift - Crochet Wall Art

Hello, my dear readers! This post is the final installment of the Christmas Gifts Showcase Series. This particular gift started with one single ball of Noro yarn, out of which I made circles of varying sizes and colours. 


When I made the circles almost a year and half ago, my original idea was to sew them onto a big crochet bag. But time went by, and the circles remained tucked away in their tin box, as no crochet bag ever materialised.

Recently, I thought about the project again and realised that a bag might not be the best way to showcase the layout I had come up with, and from then on I knew that the circles would become part of a wall art piece. Then I decided I would make a Christmas gift out of it.

So let's have a look:


I sewed all circles on a large piece of cream felt with invisible thread. I had a little bit of a nightmare using the invisible thread because it is, well, invisible, and therefore very easy to lose sight of, especially when you belong to the blind-as-a-bat species... Anyway, I managed to do it in the end, and put the finishing touch to the project by adding a row of blanket stitches and slip stitches all around the felt rectangle. Ideally I should have waited to take pictures until AFTER I'd blocked the piece, but daylight was fast dwindling unfortunately. So, sorry about those wrinkles!

Here are some pictures of details:


And this concludes the Christmas Gifts Series! About time as well, since this is nearly the end of January :D

Thank you for reading anyway, and see you soon for more crafty adventures!